A customization and tweaker designed for Windows 7 (Also works with Vista!). This is a small, light-weight, updatable and Open For All version of WinBubbles.
winbubblelite
In just few clicks, WinBubbles-Lite will let you access the most important Customization functions of Windows 7 (and Vista) easily.
The powerful utility includes a built-in Graphical User Interface designer and programmer called RegDevelop that will let you update the program the way that you want. Add Features that is needed.
ide
Any part on the program can be updated, Not just for the Programmers But For All.
Note: Before changing to IDE mode (update or change the program settings), It is a must and recommended to read first the documentations available regarding RegDevelop.
Features
Branding your new Vista and Windows 7 Machine
*
Add or Change Original Manufacturers logo and information
*
Separately Customize the Performance Information and Tools Logo
*
Change or Customize the Background of Windows 7 Welcome Screen
*
Change the Owner Information
More Customizations, Restriction and Tweaks
*
Add Message before logon: Read here
*
Customize Bubbles Screen Saver - Change to small/Medium size, Metallic Bubbles, remove the shadow and launch in a Black Background.
*
Add “Move To” and “Copy To” Right-Click Menu
*
“Opened with Notepad” Context/Right-Click Menu
*
“Hide this file” and “Hide this Folder” Right-Click Menu – Standard and Run as Admin is included
*
No Folder Option (Logoff is needed in Windows 7)
*
Disable Regedit
*
Disable CMD.exe
*
Disable Windows Task Manager
*
Disable Changing of Wallpaper
*
Disable Control Panel
*
Disable USB Drive in Windows 7 (Reboot is needed) and Vista
*
Disable Control Panel
*
Enter Username before login
*
Changing UAC levels launcher and Change the settings to “Prompt for credentials”
WinBubbles-Lite 2009 Design:
*
The program was designed for 800 x 600 resolutions and above. For lower resolutions you can access the Apply Button by pressing Alt-A.
*
Compared to WinBubble, Because of RegDevelop IDE even if you switch from any resolutions, the vertical and horizontal scroll bar will show. Also, If the window become small or bigger, Just move or drag the program and it will automatically change in size.
*
Every settings done by the program will be seen… No more Winbubble Anti-Registry Setting Theft!
For geeks and tweakers who wants to update the program. Read this first and Please share it to us afterwards.
Thank you very much and Enjoy!
*FreewareFiles.com Editors Pick! and *Softpedia 100% Clean Award
*Proudly Listed at Download.com and MajorGeeks.com!
Monday, August 10, 2009
WinBubbles Lite 2009, Access Windows 7 (and Vista) Customizations easily

Wednesday, January 2, 2008
How-to Create a Windows Vista IIS7 MySQL PHP Web Server
This guide shows you how to create a Windows Vista powered web server using IIS7, MySQL, and PHP (WIMP). I know, I know, a WIMP server doesn’t sound too appealing. Trust me, this server is far from a wimp and will blow your socks off if you provide the right hardware.
Note: This is a generic WIMP server that’s capable of running WordPress, PHPbb, and other popular PHP and MySQL powered web sites. You might have to change a few things to get your WIMP server running just right depending on your usage.
The Limitations
Before you go too far you need to know that IIS7 running on Windows Vista is full featured with a few limitations.
Before you right this type of server off because it’s limited you need to realize if you ever reach one of the limitations you’ll have so much traffic you could probably buy an actual server with one day’s pay from the web site.
The Limitations
Request Execution Limit: IIS7 running on Windows Vista Basic, Starter, Home, and Home Premium have a Request Execution Limit of 3. Vista Ultimate is limited to 10. Request Execution Limit is how many simultaneous pages the web server can give out at one time. That means Vista Basic, Starter, and Home editions can serve up to 259,200 pages per day and Ultimate can serve up to 864,000 pages per day!
FTP: FTP is very limited. You can only download files as anonymous. No uploading via FTP to your web server. If this is a problem, check out the FileZilla FTP Server.
Install IIS7
First thing first, we need to install a web server.
Open the Control Panel in classic view.
Double-click Programs and Features.
Click Turn Windows features on or off on the left.
Check off Internet Information Services.
Expand Internet Information Services, World Wide Web Services, Application Development Features, and then check off ISAPI Extensions। ISAPI will be needed later when we install PHP.
Click OK to install IIS7.
When the Windows Features box disappears IIS7 is installed and should be running. Test IIS7 by going to http://localhost in your web browser। You should see an IIS7 test page like the screenshot below.


The root of the default web site is located at C:\inetpub\wwwroot. Your web site goes there.
Install PHP
Now that we have a web server we need support for PHP. In this example I’m installing PHP 5.2.4.
Create a folder called php in the root of the C: drive.
Download the Windows Binaries Zip package from http://www.php.net/downloads.php.
Extract the files and save them in the php folder you just created.
Copy C:\php\php.ini-dist and save it on your desktop so we can work with it.
Rename php.ini-dist you just copied on your desktop to php.ini.
Right-click php.ini and select Edit.
Search for extension=php_mysql.dll and uncomment it by deleting the ; in front of it. This allows php to login a MySQL database.
Now move up in the php.ini code and look for extension_dir = “./”. Change “./” to “C:\php\ext”. This shows php where to load the extension=php_mysql.dll extension you just uncommented.
Save php.ini.
Copy php.ini and save it in C:\Windows.
Open the IIS Manager by typing IIS Manager in the Start Menu’s search box and click Internet Information Services (IIS) Manager in the search results.
Double-click Handler Mappings.
Click Add Script Map located on the right.
Fill out the Add Script Map window like the screen shot below.

Click OK to save the changes.
Click Yes in the window that asks you if you want to enable this ISAPI extension.
Click the back button in the IIS Manager and then double-click Default Document.
Type index.php, with a space behind , in the File names list.
Click Apply on the top right of IIS Manager.
Now you need to copy libmysql.dll from C:\php and save it in C:\WINDOWS\System32. Thanks for the fix Oruba.
Lets test to make sure php is installed and running correctly.
Open notepad.
Type < ? phpInfo() ?> in the blank document.
Note: Remove the space between < ? in < ? phoInfo() ?>. I had to add the space so the command doesn’t execute on this page.
Save it as test.php on your desktop and then move it to C:\inetpub\wwwroot.
Note: A common mistake when saving test.php is to save it as test.php.txt. Don’t forget to select All files under Save as type and then name the file test.php in notepad.
Go to http://localhost/test।php। You should get a php information page similar to the screen shot below. Install MySQL
Before we can install MySQL we need to disable UAC in Windows Vista।
Open the Control Panel in classic view.
Click User Accounts.
Click Turn User Account Control on or off.
Uncheck Use User Account Control and then click OK.
Restart your computer.
Note: You can turn UAC back on after everything has been installed and working.
Now we can install MySQL. In this example I’m going to install MySQL Community Edition 5.0.45.
Download the Windows ZIP/setup.exe version http://dev.mysql.com/downloads/mysql/5.0.html#win32.
Unzip it and save setup.exe on your desktop.
Run Setup.exe.
The welcome window will popup। Click Next.
Since this is a general guide on creating a WIMP server leave Typical selected and click Next.
Let MySQL install in its default directory by simply clicking Install in this window.
Click Next to move through a few advertisements.
Leave Configure the MySQL Server now checked and click Finished.
Click Next at the welcome window.
I’m assuming that you don’t need to configure any advanced MySQL settings. If you did you probably wouldn’t need this guide or you should leave this job to an expert. Select Standard Configuration and then click Next.
Leave Install As Windows Service, the service name MySQL, and Launch MySQL Automatically checked and click Next.
Type the MySQL administrator (root) password twice and then click Next.
This part is VERY important. Hold your mouth just right, cross your fingers and click Execute to configure MySQL. If you did it just right you should get 4 check marks when it’s done.
Note: If you get a Connection Error, click Retry and it should work. This is caused by a slower computer not starting the MySQL service fast enough.
Click Finished.
Now that you have MySQL installed and running lets install the GUI Tools to make managing databases easy.
Download the GUI Tools (Windows x86) at http://dev.mysql.com/downloads/gui-tools/5.0.html.
Install it just like any other software.
Click Start, All Programs, MySQL, MySQL Administrator.
Fill in the fields just like the screen shot below.
Remember: Root’s password is the one you set when you installed MySQL.
Once MySQL Administrator is open, you can create a new database by clicking Catalogs and then right-clicking under test and select Create Schema.
Give it a name and there you go!
Open Port 80
Now that you have a working WIMP lets open it up to the world। All internet (HTTP) traffic passes through port 80. Let’s open port 80 to the world.
Search for firewall in the search box in the Start Menu and click Windows Firewall in the search results.
Click the Exceptions tab in the Windows Firewall Settings window.
Click the Add port button.
Type HTTP as the name and 80 as the port number.
Adjust Vista for Web Server Performance
Because Windows Vista is not meant to be a server out of the box its priorities are backwards when it’s being used as a web server. Windows Vista prioritizes programs like Word before background services like IIS7 to give the end user the best experience possible. Since we’re configuring Windows Vista as a web server background services need to be Vistas priority instead of programs.
Let’s set Windows Vista’s services as a higher priority than programs to squeeze the most speed out of it as we can.
Right-click Computer in the Start Menu and then select Properties.
Click Advanced system settings.
Click Settings under Performance in the Advanced tab of the System Properties window.
Click the Advanced tab in the Performance Options window.
Select Background services.
Click OK and then restart your computer।
Hardware
A web server with low to modest traffic doesn’t have to be a powerful machine to get the job done। Any modern PC with at least 1GBs of RAM (2GBs recommended for MySQL) will do fine. If you become one of the fortunate ones who receives enough traffic to need a high performance web server here are a few hardware tips.
Memory: If you’re expecting any kind of modest traffic (many thousands of hits per day) memory is very important. 2GBs is a good start but 3 or 4 are better.
IIS7: A powerful processor(s) and a good amount of memory are important.
MySQL: A fast hard drive and lots of memory are important for a MySQL database.
The Command Prompt still lives in Windows Vista
We've come a long way since then and are now preparing ourselves for a bright future with Windows Vista's Aero interface topped off with the Glass theme and all the other visual goodies that come with it. However, even though the fancy Windows user interface offers just about everything that I could ask for in an operating system, the old computer user in me still wants to open the Command Prompt and take my aged DOS skills out for a walk around the block. And why not? You can still accomplish some amazing tasks with just a couple of keystrokes. Granted, you have to know about and understand the commands that you have at your disposal.
Well, if you're like me, then you'll be glad to know that the developers at Microsoft have kept us in mind, even as they've been crafting the new Aero interface. The Command Prompt still lives in Windows Vista, the majority of the great command line tools introduced with Windows XP are still available, and there are several new native command line tools for us old timers to investigate. Plus, there are a few tricks that you'll want to know about. Let's take a look.
Opening the Command Prompt
To begin with, you can open a Command Prompt window in Vista in all the same ways that you can in Windows XP. You can use the Command Prompt shortcut on the Start menu or you can type CMD in the Run dialog box. When the Command Prompt window appears, you'll notice the new version number and the fact that the default user profile directory is now C:\Users rather than C:\Documents and Settings. Figure A shows the Windows Vista' Command Prompt window overlapping Windows XP's for comparison.
Figure A

You can better see the subtle differences in the Command Prompt windows when they appear with one overlapping the other.
You'll also notice that the new Command Prompt window takes advantage of Vista's Aero user interface window style with the new the Maximize, Minimize, and Close buttons and rounded corners. In Windows XP, the Command Prompt window uses the Windows Classic style. (Keep in mind that the default color scheme of the Command Prompt environment is still grey text on a black background.)
When you access the Command Prompt Properties dialog box, you'll find that the controls are almost identical. The only difference is that the Options tab in Windows Vista no longer provides the Display Options panel, which contained the Window and Full Screen settings. In fact, I received an error message when I pressed the Full Screen shortcuts keys [Alt][Enter]. It appears that running a full screen Command Prompt window in Windows Vista is no longer possible.
User Account Control (UAC) applies
As you may have guessed, there are command line tools that require administrative privileges and bring up what I'll call the Command Prompt equivalent of the User Account Control (UAC). For example, when attempting to run the Fsutil command from my local user account, which is an Administrator account type, I encountered the message shown in Figure B.
Figure B

There are command line tools in Windows Vista that require administrative privileges in order to run.
While this isn't exactly a UAC prompt like those in the GUI, it did force me to close the current Command Prompt window, return to the Start menu, right-click on the Command Prompt shortcut, and select the Run As Administrator command. I then encountered a regular UAC, as shown in Figure C.

Figure C
In order to run the Command Prompt administrative privileges you must go through a UAC.
While this was an inconvenience the first time I encountered it, it really won't be a big deal in the future, because I'll know that for certain command line tools, I'll have to use the Run As Administrator command. So I still don't mind working around UACs because I appreciate the level of protection they offer.
A few new command line tools
There appears to be quite an impressive list of command line tools in Windows Vista; however, the Windows Help and Support tool is still under construction and the command line tools aren't yet documented here. However, if you turn to the Help command at the command prompt itself, you'll see that all of your favorite command line tools are still available. You'll also find some very basic information on syntax and usage for the new command line tools, as I mentioned earlier.
The first new command line tool I encountered is Icacls, which is like Cacls on steroids. Even though Cacls is still available in Windows Vista, Icacls is designed as its replacement. In fact, when you run Cacls a note appears that reads:
Cacls is now deprecated, please use Icacls.
An odd word choice, I must admit. If Microsoft were actually going to denounce, condemn or denigrate Cacls, I would think that they would just remove it from the operating system.
In any case, Icacls is designed to not only display and modify ACLs but also to backup and restore ACLs for files and directories. In order to perform all these tasks, Icacls comes with a very hefty list of parameters and switches.
The next command line tool, Robocopy, isn't really new at all, it's just never actually been part of the operating system. Robocopy has been part of the Resource Kit toolbox since Windows NT 4.0. As you may know, Robocopy is an extremely robust copy utility that many folks use instead of Copy and Xcopy.
Another new, yet obscure, command line tool is called Mlink, and is used to create symbolic and hard links between files and folders. For example, I could use this tool to essentially map C:\CurrentWork, so that it points to C:\Documents and Settings\Greg Shultz\My Documents\My Work\Freelance\TechRepublic\July 06. This would save my from having to navigate though a long directory tree when working with files in the July 06 folder. Instead I could simply access CurrentWork.
Conclusion
As I experiment with Windows Vista Beta 2, I'll continue reporting on all of the new and improved features in this edition of the operating system. As always, if you have comments or information to share about Windows Vista's Command Prompt, please take a moment to drop by the Discussion area and let us hear.
Sunday, December 30, 2007
Supporting Clients Through Windows XP’s Remote Desktop, Part 2
There are a lot of options that you can set besides just which computer that you want to connect to. In most cases, you can enter the name (or IP address) of the remote system and just go with the default options. However, there may be times when your needs will dictate fine tuning a session.
To set the various options, Click the Options button. When you do, the Remote Desktop Connection screen will expand to reveal an entire properties sheet, filled with connection options. The General tab lets you select a computer to connect to. You can also use this screen to enter a user name, password, and domain for the connection. If you leave this information blank, Windows will prompt you to enter a password after the connection is established. At the bottom of the General tab, there are options that you can use to save all of your settings. This is helpful if you have a remote machine that has special needs, or if you want to set up a custom configuration to use with all of your remote connections.
The next tab that you’ll see is the Display tab. The Display tab is used to control the way that the remote session appears on the local machine. By default, the remote session will take up your entire screen, although you can use the Display tab to reduce its size. You can also select the number of colors that the remote session will appear in. Finally, at the bottom of the screen, there’s an option to display the connection bar when running in full screen mode. I recommend always using this option. When running in Full Screen, the connection bar will provide you with the name of the computer that you’re connected to and the buttons that you’ll need for reducing the session to a window.
The Local Resources tab is typically one of the tabs that requires the most fine tuning. This tab controls the behavior of the remote session. For example, you can control whether sound is transmitted from the remote computer to the local computer or not. Sound consumes a lot of bandwidth, so you may want to disable it. Likewise, the Local Resources tab allows you to determine when you can use keyboard shortcuts, such as Ctrl, Alt, Delete, to control the remote machine. By default, if the remote session is running in full screen mode, then keyboard shortcuts apply to the remote machine, otherwise, they apply to the local machine.
Finally, the Local Resources tab allows you to control whether you want to control the disk drives, printers, and serial ports on the remote machine. By default, you’ll have control of the remote machine’s printers, but not the disk drives or serial ports.
The Programs tab allows you to specify a program that is to run upon connection to the remote machine. For example, you might run System Information upon connecting.
The last tab that you’ll have to deal with is the Experience tab. The basic idea behind this tab is that it allows you to select what amount of bandwidth that you’ll have available during the remote session. By default, Windows assumes that you’ll be connecting via a 56 Kbps modem. Beneath the connection speed option, there are several check boxes that turn various features on or off. For example, during a low speed connection, you probably don’t want to waste bandwidth by displaying the remote machine’s wallpaper.
As you select your connection speed, Windows enables and disables the various options depending on how much bandwidth that you have available. Fortunately, you can override Windows selections and manually enable or disable any setting that you want. For example, I used to know a guy that created a custom wallpaper for each workstation. The wallpaper was an image that told the machine’s basic configuration information. The idea was that anyone who went to work on the machine would have the machine’s vital stats available to them at a glance. If someone were running a wallpaper like this, they wouldn’t want Windows to disable it during a remote session, and would therefore choose to override the default low bandwidth settings. The options that you can enable or disable are Desktop Background, Show Contents of Window While Dragging, Menu and Window Animation, Themes, and Bitmap Caching.
Connecting To A Remote Machine
What actually happens when you connect to the remote machine depends greatly on how you’ve setup the session. If you simply go with the default settings, your remote session will begin by displaying the usual login prompt. Once you’ve entered a password, Windows will lock the remote machine. When this happens, the remote machine will display the same message that the user would see had they pressed CTRL, ALT, Delete and used the Lock Computer option. If the remote user were to press CTRL, ALT Delete and enter a password to unlock their machine, Windows would drop the remote connection.
As for the local user, the remote session behaves exactly as if the local user were sitting at the remote PC (although possibly slower if bandwidth is an issue). The only thing that the local user has to remind them that they are using a remote session is a small bar at the top of the screen that displays the name of the remote PC. This bar also contains the standard minimize, maximize, and close window buttons. These buttons are handy for situations in which the local user needs to access their own machine for a moment. The close window icon can is used to end the remote session, although you can also end the session by reducing the session to a window and then right clicking on the remote session and clicking selecting the Close command from the resulting properties sheet.
Another interesting thing about running a remote session is the way that screen resolution is handled. In my lab, I connected to a machine that was running multiple monitors. Each monitor was running at a much higher resolution than my test machine. When I connected, Windows set up the local machine as if all of the remote machines were running on a single monitor. It also scaled all of the open windows so that they would fit the local machine’s limited display capabilities.
As you can see, Windows XP’s Remote Desktop feature is an extremely valuable helpdesk tool. This is especially true in organizations in which users are geographically dispersed.
Supporting Clients Through Windows XP’s Remote Desktop, Part 1
If that situation happened today though, it could have been easily avoided. Bandwidth is now much more plentiful then it was a few years ago, and Windows XP has remote access capabilities built into the operating system. In this article, I’ll demonstrate how your support staff can reduce costs by taking advantage of Windows XP’s remote desktop feature. As I do, I’ll show you the ins and outs of how remote desktop works.
The Basics
Remote desktop works very similarly to the Windows 2000 Terminal Services. In fact, the local PC actually uses a cosmetically altered version of the Terminal Server Client to access the remote PC. During a remote desktop session, Windows XP uses something called the Display Protocol. This protocol sends keyboard and mouse movements from the local machine to the remote machine, where the remote desktop code acts as if the keyboard and mouse movements were generated locally. The remote machine then sends screen updates to the local machine to display the results of any actions that are being performed remotely. It’s also possible for the remote machine to send sound to the local machine, but I don’t recommend doing so because of the required amount of bandwidth.
Another thing that you should know is that during a remote session, any programs that the local machine initiates are actually being run on the remote machine. This means that it’s possible for the local machine to run programs that aren’t installed on it. It also means that it’s possible for the local machine to run programs that aren’t compatible with it. For example, suppose for a moment that you connected to a remote machine through a Pocket PC. It would be possible for you to run any application that’s installed on the remote machine because you’re actually using the remote machines resources rather than those of the Pocket PC (which isn’t even capable of running most Windows programs).
The last thing that I need to mention before I show you how to implement remote desktop is that not all versions of Windows XP support it. Only Windows XP Professional can host a remote desktop session. The home version ships with the ability to control a remote PC, but can’t host a remote session. This means that you can use the home edition or the professional edition to control a machine that’s running Windows XP professional, but neither version can control a machine that’s running the home edition.
Preparing the Remote Machines
Before you can remotely control a machine, the machine has to be prepared for remote access. If you’re going to be performing a mass Windows XP deployment, you’ll be able to set the remote desktop settings at the same time that you configure all of the other Windows settings. If you’ve already deployed Windows XP though, you’ll have to implement the Remote Desktop settings on an individual basis. There are a few good ways to accomplish this.
One method is to just go around to every machine and turn the feature on. Another method is to enable the feature the first time that each user calls you with a problem. By using this method, you’ll usually end up installing remote desktop on the machines belonging to the users who have the most problems first, and then gradually to the users who call less often.
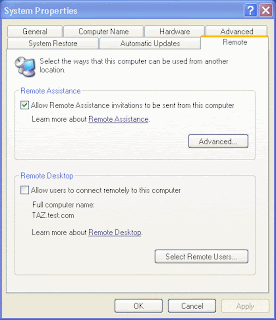
To implement remote desktop on a workstation, go to the Start Menu and right click on My computer। Now, select the Properties command from the resulting context menu in order to display the system’s properties sheet. At this point, select the properties sheet’s Remote tab. As you can see in Figure A, the Remote tab contains two check boxes. One check box is to allow users to remotely connect to the computer, while the other allows remote assistance invitations to be sent from the computer.
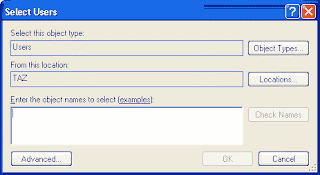
Windows will now display the Remote Desktop Users dialog box. Click the Add button to begin adding users to the list. If you’re in the habit of selecting which users can access a network resource, then this screen may look a little funny to you. As you can see in Figure B, Windows is set by default to work with user objects from the local computer. The reason is that the people who developed this portion of Windows XP assumed that most of the time when you access a remote PC in this manner, you won’t be authenticated into a domain. You can select domain users though by clicking the Locations button and selecting a domain from the list. Regardless of whether you’re working with domain users or local users, you won’t be able to select the users from the list. Instead, you’ll have to manually enter the user name and then use the Check Names button to verify that you spelled the user names correctly.
Figure B
As I mentioned, the reason that this particular feature is so strange to setup is that Microsoft intended it to be used for other purposes. They designed it as a way to allow you to access your PC at the office from home or while you’re on the go. Although there’s another option that’s actually intended for tech support, I recommend going ahead and enabling the remote desktop in the manner that I just described. You should also assign a standard account access to all machines. The reason for doing this is that the remote desktop option that’s actually intended for tech support purposes requires a user to send an invitation to someone, asking for help. If the user can’t figure out how to send an invitation, then they won’t be able to get remote assistance. By going ahead and enabling the type of remote access that I just showed you, you’ll be able to help users by remote even if they don’t know how to send an invitation.
That doesn’t mean that the users shouldn’t be able to send an invitation though. I recommend leaving the option for remote assistance invitations enabled. You can however control the length of time that an invitation is valid by clicking the advanced button on the System Properties sheet’s Remote tab. By default, invitations are valid for 30 days.
Right now, you may be wondering what the deal is with a remote assistance invitation. Remote assistance invitations are a method through which end users may ask for help. Typically, users generate an E-mail message that includes an invitation. However, invitations may also be sent through Windows messenger or through a file. Before you implement the ability for users to send remote invitations, keep in mind that there are some very serious security risks associated with doing so. I’ll be addressing these security risks in a separate article series. For now though, it’s just important to understand what remote invitations are and what they do.
As you can see, setting up remote access capabilities provides the support staff with a low cost way of servicing your end users. This technique is especially effective in organizations that are geographically dispersed.
Repairing The Master Boot Record
To answer that question, it’s necessary to take a closer look at how this particular type of virus works. Normally, the MBR points at a system’s boot sector. When the system is powered up, the hardware knows to look at the MBR, and then the MBR redirects the system to the boot sector so that the boot process can begin.
Most, but not all, viruses that infect the MBR do so by copying the contents of the boot sector to a different file and then overwriting the boot sector with viral code. When you remove a boot sector virus, the anti virus program is usually smart enough to know where the original boot sector was copied to. It then removes the viral code and moves the boot sector code back to the correct location.
Unfortunately, some viruses don’t backup the boot sector code before altering it. Likewise, there are also legitimate programs that can cause boot problems similar to that of a virus. For example, I was recently using a program called System Commander from VCOM. System Commander alters the boot sector so that your system will boot the System Commander program instead of the normal operating system. The program then displays a menu and allows you to boot to a variety of operating systems. However, I had decided to remove an operating system from a computer and System Commander was damaged in the process.
After the damage occurred, the system was unbootable. The system would try to boot to a nonexistent copy of System Commander. Unfortunately, it was impossible to reinstall System Commander because the system was unbootable. As you can see, in such a case, perfectly legitimate software can function exactly like a boot sector virus. This means that whether your MBR is malfunctioning because of a virus or because of a boot program gone haywire, the repair method is exactly the same.
Obviously, the best repair method is to restore a backup or to use a repair disk such as the one created by Norton’s System Works. However, if you don’t happen to have such a recovery tool, you’ll have to do things the old fashion way. You can also forget about reformatting or repartitioning the drive, as these operations don’t effect the boot sector. The method that you’d use to recover from such a situation depends on the operating system that you’re using.
If your system is running Windows 98, use a separate system to create a bootable floppy disk and copy the FDISK file to it. Now, boot the damaged system from the boot floppy. When you’ve booted the system to a command prompt, enter the following command:
FDISK /MBR
This will repair the Master Boot Record and make the system bootable. If you happen to be using a Windows 2000 system, you can boot from the installation disks and enter the Recovery Console. When the Recovery Console loads, you can use the FIXBOOT or the FIXMBR command to cure the problem.
Using Windows CE to Manage Your Windows 2000 Network
Reprinted by permission from Imagine that you’re in the car driving down a long and desolate interstate, out in the middle of nowhere. Just as you think you’re about to scream from boredom, the phone rings. Someone at your office decided to interrupt your travel to tell you about some terrifying message that’s being displayed on the server. Now, you have two choices, you can either run up your cell phone bill and try to explain to the clueless person on the phone how to fix the problem, or you can pull over, get out the palm top, fix the problem and be on your merry way. Although the idea of having total control of your network from a device that’s small enough to fit into your pocket, all from the comfort of your own car may sound like a fantasy, it really works. In this article, we’ll explain how to use your Windows CE machine to remotely control your Windows 2000 servers.
The requirements
There are some pretty stiff hardware and software requirements for controlling Windows 2000 through Windows CE. First, not just any Windows CE device will work. The PDA style Windows CE machines with no keyboard were never designed for this type of work, and are therefore unsupported. You must have a palm top computer or one of the new pocket PCs. For the purposes of writing this article, we used a Hewlett Packard Jornada 680.
Your Windows CE device must also have some method of connecting to Windows 2000 via TCP/IP. We used a network card in our palm top, but if you’ve got Windows 2000 configured to function as a remote access server (a RAS server), you can dial in and control Windows 2000. The actual connection method is irrelevant as long as you authenticate into the domain that your server is a member of, and connect using TCP/IP.
As we mentioned before, you’ll also need some special software. The server must be configured to run the Terminal services. For the purposes of writing the article, we used Windows 2000 Advanced Server release candidate 2. We also attempted to connect Windows to a computer running Windows 2000 Server beta 3, but had a lot of trouble. That fact is trivial though since there’s a good chance that the final release will be available by the time that you read this.
The Windows CE machine also requires special software. Windows CE must be running the Terminal Server client software to be able to remote control the Windows 2000 server. We’ll tell you how to get this software later on.
Things to consider on the server
Before you set up the server for remote access, there are a few things that you need to consider. The terminal services can take a tremendous toll on the server. The terminal services use memory, the processor, hard disk, and the network card very heavily. The purpose of this article is to explain how to remotely control the server in emergency situations. Therefore, extremely high end hardware isn’t necessarily a requirement. We ran the terminal services on a Windows 2000 Advanced Server with 128 MB of RAM with no problems. However, if anyone else plans on using the terminal server, remember that the amount of power required is directly proportional to the number of remote users, the number of programs that each user runs, and the types of programs that these users run. A generic word processor for example doesn’t require anywhere near the horsepower of a large database or a video game. To run a terminal server for more than emergency administrative purposes, Microsoft recommends 128 MB of RAM with an extra 10 MB to 21 MB of RAM for each user depending on what types of programs that they run. Microsoft also recommends multiple processors, RAID arrays, and fast network connections for multiple terminal server users. There are also many more security issues involved in allowing multiple user access. We’ll publish an article dedicated to allowing multiple users in the future.
Installing the terminal server service
To install the terminal services on the Windows 2000 server, open the Control Panel and double click on the Add / Remove Programs icon. When you see the Add / Remove Programs window, click the Windows Setup button. At this point, the computer may appear to ignore your request. However, if this happens, the Windows Components Wizard has merely opened in the background. Close the Add / Remove Programs window to access the Windows Components Wizard.
When you see the Wizard, select the check box next to Terminal Services and next to Terminal Services Licensing. Click Next and Windows will begin installing the required components. The first question that you are asked is whether you want to install the terminal services in Remote Administration Mode or in Application Server Mode. Select Remote Administration Mode and click the Next button. The next portion of the wizard will ask you about the role and location of the license server. Unless you have a compelling reason to change these options, use the defaults and click Next to continue. At this point, Windows 2000 will ask for the Windows 2000 CD-ROM and begin copying all of the necessary files. When the wizard completes, click Finish. You’ll now be prompted to reboot your server.
Setting up Windows CE
As we mentioned earlier, accessing the Windows 2000 server by remote control requires that you attach to the server through TCP/IP and that you authenticate the Windows CE machine into the Windows 2000 domain. Make sure that you’ve established this ability before continuing. If you have questions about how to do this, check out last month’s article, “Connecting to The World With Windows CE”.
Once you have the ability to connect to the server, use a desktop PC and download the Terminal Server Client for Windows CE. You can download it from www.microsoft.com/windowsce. Once you’ve downloaded the client, attach the desktop to your palmtop via serial cable or infrared port and run the program that you just downloaded on the desktop machine. The program will install the necessary files on the Windows CE machine.
Once you’ve installed the necessary files, select the Client Connection Wizard command from your Windows CE machine’s Start Programs Terminal Server Client menu. The first screen of the wizard asks for a description of the session and the name of the server that you want to control. Enter anything that you want for the description, but we’ve had better luck entering the server’s IP address than its name into the Server Name field. Click Next to continue.
The next screen that you’ll see allows you to log on automatically. This one is up to you. If you want to log on automatically, select the Log On Automatically check box and then fill in the Username, Password and Domain fields. The only down side to logging in automatically is that if you were ever to lose your palm top, who ever finds it could access your server. When you’ve filled in the necessary information, click Next to continue.
The final screen of the wizard asks whether you want to display the server’s desktop, or automatically launch an application. Since the purpose of this configuration is remote administration, select the Display Desktop radio button and click finish. Windows CE will now place an icon on your desktop that you can use to remotely control your server.
Connecting to the server
At this point, you’re ready to connect Windows CE to your Windows 2000 server. To do so, begin be establishing the communications link, whether by dial up networking or via a network card. Once you’ve logged into your network, double tap on the icon that you created earlier. Doing so will connect to Windows 2000 through your TCP/IP link. The login process should be automatic since you’re already authenticated into the domain.
When you connect, the first thing that you may notice is that the Windows 2000 desktop looks different on your Windows CE device. That’s because of the difference in resolution from Windows 2000 to Windows CE. Because Windows CE can’t display the entire screen, some of the icons are temporarily rearranged to make them fit onto the visible desktop.
The next thing that you may notice is that the icons aren’t as responsive as you would expect. The first time that we configured Windows CE to remotely control Windows 2000, we thought that there was a security option that we neglected to set, because half of the icons wouldn’t work. Instead, the problem was that the terminal server seems to require much more accurate tapping than a standard Windows CE session does. It’s been our experience that when double tapping, if the second tap isn’t in exactly the same spot as the first tap, then it doesn’t work. We found this to be extremely difficult. It’s much easier to simply select the icon that you want to use and then press Enter.
We also noticed that some of the Start menu’s sub menus behaved strangely. For example, when we went to Start Programs Accessories, the menu would freak out and take us into My Documents. The solution to this was simple. All we had to do was to make sure that the point of the stylus never came off of the screen when accessing the menus. For example, we would tap on start and then press the stylus on programs. We would then keep the stylus on the screen while selecting Accessories and what ever choice came next.
The last problem that we encountered was that many times the utility that we wanted to use didn’t completely fit on the Windows CE screen. This wouldn’t be a problem, except that there was no scroll bar to access the bottom portion of the screen. Although it’s not perfect, the display works much better if you disable Active Desktop for terminal server clients. To do so, open the Control Panel on the Windows 2000 computer and double click on the Administrative Tools icon. When you do, you’ll see the Administrative Tools window. Now, double click on the Terminal Services Configuration icon to launch the Terminal Services Configuration utility. Now, click on the Server Settings folder in the column on the left to view the configurable settings on the right. One of the options is for Active Desktop. Now, simply right click on the Active Desktop icon and choose the Disable command from the resulting context menu. The changes won’t take effect until the next time that you connect Windows CE with a new session.
Ending your session
When you’re done using the terminal server session on your Windows CE machine, select the Shut Down command from the Start menu. There are two commands on this menu that need a little explaining. The Log Off command disconnects you from the Terminal Server and restores the normal Windows CE desktop. This is the command that you should normally use to disconnect.
The Disconnect command also returns you to the Windows CE desktop, but leaves your session active on the Terminal Server. This means that even though you’re not using the Terminal Server, server resources are still being wasted on the session. Your programs and files are still opened, exactly in the state that they were in when you disconnected. The next time that you attach to the Terminal Server, you’ll be exactly where you were when you disconnected the last time.
Conclusion
In this article, we’ve discussed a way that you can use your palm top computer to manage your network on the go. As we did, we explained all of the necessary hardware and software requirements for doing so. We also discussed all of the unique aspects that you’ll have to deal with because of Windows CE’s limitations.
Wednesday, December 19, 2007
Mobile Master Professional 6.8.2.2402
Mobile Master is a Cell phone and handset manager for Windows and synchronizes with a few mouse clicks your contacts and appointments between the handset and your computer. Edit and synchronize calendar entries (appointments and tasks).
Send, read, archive SMS Note: the SMS Servant is included in the Mobile Master installation but requires an extra license. Logo-Editor, modify ring tone. Copy Station for transmitting your address book easily from one phone to the other. Mobile Master Agent: reach always the important functions easily and start e.g. Mobile Master automatically as soon as your mobile phone is connected to the PC.
- One click synchronization solution for your mobile phone, edit all you phones data with the computer. Synchronization of contacts and the calendar, Many filter possibilities, AddIns for Outlook, Lotus Notes, Palm Desktop and Thunderbird
- Mobile Master synchronizes or just copies all data with/to your mobile phone.Synchronize with: Outlook, Lotus Notes, Novell Groupwise, Palm Desktop, Thunderbird, Tobit David, Eudora, The Bat, Outlook Express, Google calendar, Windows contacts and calendar, iTunes
- new cell phone: Mobile Master copies the phone/address book from your old to your new one regardless the manufacturer of the phones new phone number, appointment or note: type it in with your PC and send it easily to the cell phone.
- Many import and export filters, e.g. one click to export to excel or open office. Can import e.g. vcf file with more than one contact and that has unicode format
- Connection with the phone: serial or USB cable, infrared or Bluetooth, up to COM Port 300 supported.
Features:
- Mobile Master is a handset manager to edit manually or synchronize automatically or on demand
- Quick area for quick and easy access to the main functions
- Comfortable editing of the phone book, calendar and note items
- easy to use user interface
- Setup Wizard for easy configuring
- Copy files, music, photos
- SMS send, archive
- Copy the address book, calendar from one phone to another
- At least one update per month for the phones and devices
- Copy play lists from iTunes and WinAmp to the phone
Supported mobile phones and devices:
- Apple iPod: iPod Video, iPod nano
- LG: KG800 Chocolate, KG320S
- Motorola: RAZR V3r, RAZR V3i, SLVR L7, SLVR L6
- Nokia: Nokia 6233, Nokia 6270, Nokia 6280, Nokia 6230, Nokia 6230i, Nokia 6220, Nokia 6210, Nokia 6200, Nokia 6100, Nokia 6310, Nokia 6310i, Nokia 6820, Nokia 6822
- Sony Ericsson: W880i W880 W710i W710 Z710i Z710 Z610i Z610 K800 K800i K800 W900i W900 W850i W850 W810i W810 W800i W800 W700i W700 W550i W550 W500i W500 W300i W300 D750i D750 K750i K750 K700i K700 K610i K610 K600i K600 K510i K510 K500i K500 K300i K300 F500i F500 S700i S700 T610i T610 V800i V800 V600i V600 Z600i Z600 Z550i Z550 Z520i Z520
- Samsung: Samsung SGH-P310, Samsung SGH-P300, Samsung SGH-D900, Samsung SGH-D830, Samsung SGH-D820, Samsung SGH-D800, Samsung SGH-D600, Samsung SGH-D520, Samsung SGH-D500, Samsung SGH-E900, Samsung SGH-E850, Samsung SGH-E800, Samsung SGH-E770, Samsung SGH-E760, Samsung SGH-E730, Samsung SGH-E720, Samsung SGH-E700, Samsung SGH-E620, Samsung SGH-E610, Samsung SGH-E570, Samsung SGH-E530, Samsung SGH-E500, Samsung SGH-E380, Samsung SGH-E370, Samsung SGH-E350, Samsung SGH-E250, Samsung SGH-X830, Samsung SGH-X820, Samsung SGH-X800, Samsung SGH-X700, Samsung SGH-X670, Samsung SGH-X660, Samsung SGH-X640
- Siemens BenQ: BenQ Siemens EL71, BenQ Siemens E61 , BenQ Siemens S88, BenQ Siemens S68, BenQ Siemens E61 , Siemens S75, Siemens SL75, Siemens CX75, Siemens CF75, Siemens C75, Siemens M75, Siemens ME75, Siemens CX70, Siemens M65, Siemens M56, Siemens S65, Siemens SL65, Siemens SK65, Siemens CX65, Siemens S56, Siemens S55, Siemens M55, Siemens SL55
and more...
Changes in Version 6.8.2 build 2402 - 31.05.07:
*reworked synchronization with motorola handsets:
*added unicode support (contacts and calendar)
*added support for the groups (contacts) and fixed problem
*fixed bug writing phone book and calendar items to the phone
*fixed bug copying phonebook pictures with long filenames
*fixed problem loading backup of a SIM card
*fixed problem reading SMS from some Samsung phones (e.g. E730)
*fixed bug saving the main number to the backup with Nokia phones
*setting of the font size of the calendar view is now possible
*fixed bug in in the last version: in the contact properties dialog sometimes the buttons were not visible
*Samsung D500/D600: sms are now read in text format
 Homepage
Size: 13.18 MB
 Download
Friday, December 7, 2007
How can I gain access to a Windows NT/2000/XP/2003 computer if I forgot the administrator's password? How can I reset the administrator's password if
Ok, so you say you forgot your Windows administrator's password, huh? Oh well, it doesn't really matter if you did or you just say you did. The fact is that you need to gain access to a computer and you cannot "remember" the administrator's password.
How can you get out of this situation without formatting and re-installing the operating system?
| Windows Key by LostPassword.com - Use this easy tool to reset any Windows local or domain controller password in a minute. Money-back guarantee. Download FREE version now! |


One method of gaining access to the system is by trying hard to remember the forgotten password, or a password of another user which has the same level of administrative rights. However I don't think this approach will help you, otherwise you wouldn't be sitting here reading article, would you?)
Another method is by trying to restore a backed up System State (in Windows 2000/XP/2003) or a ERD (in NT 4.0) in which you do remember the password. The problem with doing so is that you'll probably lose all of the recently add users and groups, and all the changed passwords for all of your users since the last backup was made.
A third method might be to install a parallel operating system on a different partition on the same computer, then use a simple trick to gain access to the old system. Read more about it on my Forgot the Administrator's Password? - Alternate Logon Trick article.
Note: If you are looking for password cracking tools that can be used for miscellaneous objectives such as password-protected PDF documents, zipped archives, Office documents, BIOS protection and so on then this pages is NOT for you. See some links at the bottom of this page for hints on where to find such tools, but I can tell you right away that Google might be a better choice for you.
The fourth option is by using 3rd party tools that will enable you to reset the lost password and logon with a blank password.
Update: You can also discuss these topics on the dedicated Petri.co.il Forgot Admin Password Forum.
Translations of this article
There are some translations made of this article. Here are the ones I am aware of (do tell me if you know of another, or if you want to create one in your language):
-
Portuguese - HERE is an excellent translation of this article into Portuguese (by Bruno Koga - Thanks!)
-
Serbian - HERE (by Aleksandar Stojilkovic - thanks!)
-
Spanish - HERE (by Victor Pereyra - thanks!)
Freeware Password Recovery Tools
Here are some of these tools:
Free Windows password-cracking tools are usually Linux boot disks that have NT file system (NTFS) drivers and software that will read the registry and rewrite the password hashes for any account including the Administrators. This process requires physical access to the console and an available floppy drive but it works like a charm! I've done it myself several times with no glitch or problem whatsoever.
Beware!!! Resetting a user's or administrator's password on some systems (like Windows XP) might cause data loss, especially EFS-encrypted files and saved passwords from within Internet Explorer. To protect yourself against EFS-encrypted files loss you should always export your Private and Public key, along with the keys for the Recovery Agent user. Please read more about EFS on my What's EFS? page. Out of the following list, the only tool that will no cause any harm to EFS-encrypted files on your hard disk is the Windows Password recovery system.
Here are 5 of these free tools:
-
Windows Password recovery - Can retrieve forgotten admin and users' passwords in minutes. Safest possible option, does not write anything to hard drive.
-
Petter Nordahl-Hagen's Offline NT Password & Registry Editor - A great boot CD/Floppy that can reset the local administrator's password.
-
Openwall's John the Ripper - Good boot floppy with cracking capabilities.
-
EBCD – Emergency Boot CD - Bootable CD, intended for system recovery in the case of software or hardware faults.
If you happen to know about other free tools please let me know  .
.
Important note for Windows Vista users: At this time there is only one solution for Window Vista and that is Petter Nordahl-Hagen's Offline NT Password & Registry Editor
Note: These password resetting tools are usually good for local users on a stand alone computer. For Domain Admin password resetting procedures please see the Related Articles section at the bottom of this page.
Note: I'd like to put together all the info you have about these issues. If you have any tips, recommended links or any ideas about how to figure out a lost password - please e-mail me and I'll get back to you .
Windows Password recovery
This site provides a tool to recover lost Windows XP passwords. It works for administrator and user accounts, it doesn't change the password just tells you the old one. It works with encrypted files (EFS) and password hashes. It even works if no passwords at all are known for the machine (as long as you have another computer with internet access to view this website with).
Author claims it also works with Windows NT and Windows Server 2003 and Windows Longhorn, but the BEST thing about it is the fact that it won't reset your passwords, but simply reveal them for you to remember and then use.
Give it a try. The author would like to receive feedback. There is a free service as well as a priority service that will retrieve your passwords within minutes. The fee for the priority service is very cheap, and is really just to cover server costs.
Note: You'll need a blank floppy to run the process.
Update: Author now offers the same tool as a CD image for those of you who do not have a floppy in their computer.
Usage, instructions and additional information can be found at
Offline NT Password & Registry Editor (v060213 - February 2006)
Petter Nordahl-Hagen has written a Windows NT/2000/XP/Vista offline password editor:
http://home.eunet.no/~pnordahl/ntpasswd
-
This is a utility to (re)set the password of any user that has a valid (local) account on your Windows NT/2000/XP/2003/Vista system, by modifying the encrypted password in the registry's SAM file.
-
You do not need to know the old password to set a new one.
-
It works offline, that is, you have to shutdown your computer and boot off a floppy disk or CD. The boot-disk includes stuff to access NTFS partitions and scripts to glue the whole thing together.
-
Works with syskey (no need to turn it off, but you can if you have lost the key)
-
Will detect and offer to unlock locked or disabled out user accounts!
Caution: If used on users that have EFS encrypted files, and the system is XP or later service packs on W2K, all encrypted files for that user will be UNREADABLE! and cannot be recovered unless you remember the old password again!
Download links:
-
cd070409.zip (~3MB) - Bootable CD image with newer drivers
-
bd050303.zip (~1.1MB) - Bootdisk image, date 050303.
-
sc050303.zip(~1.4MB) - SCSI-drivers (050303) (only use newest drivers with newest bootdisk, this one works with bd050303)
To write these images to a floppy disk you'll need RawWrite2 which is included in the Bootdisk image download. To create the CD you just need to use your favorite CD burning program and burn the .ISO file to CD.
Support and Problems? Don't call me! Talk to the creator of this great tool. He also has a good FAQ set up covering most of the day-to-day questions. Read it right HERE
Author claims that this tool was successfully tested on NT 3.51, NT 4, Windows 2000 (except datacenter), Windows XP (all versions) and Window Server 2003. Notice that it is NOT compatible with Active Directory.
Need to change Windows NT/2000 Domain Admin password? This tool, however useful, will only reset the local administrator's password (e.g. the one found in the local computer's SAM). To reset a password of a domain administrator (or any other user for that matter) you must perform the routine that is described in the following page: Forgot the Administrator's Password? - Reset Domain Admin Password in Windows 2000 AD.
Note: The above trick will probably not work under Windows Server 2003 due to service account security changes. To work around these limitations please read the Forgot the Administrator's Password? - Reset Domain Admin Password in Windows Server 2003 AD page.
John the Ripper (v1.7.0.1)
John the Ripper is a fast password cracker, currently available for many flavors of Unix (11 are officially supported, not counting different architectures), DOS, Win32, BeOS, and OpenVMS. Its primary purpose is to detect weak Unix passwords. Besides several crypt(3) password hash types most commonly found on various Unix flavors, supported out of the box are Kerberos AFS and Windows NT/2000/XP LM hashes, plus several more with contributed patches.
Read more at http://www.openwall.com/john
Download links:
John the Ripper 1.7.0.1 (1.32mb)
A Pro version also exists on the author's site, however that one costs money.
EBCD – Emergency Boot CD (v0.61 - October 2004)
EBCD is a bootable CD, intended for system recovery in the case of software or hardware faults. It is able to create backup copies of normally working system and restore system to saved state. It contains the best system software ever created, properly compiled and configured for the maximum efficient use.
EBCD will be very useful when you need to:
-
Copy/move files (with long names, not necessary in CP437 encoding) from/to the disk but OS which can handle them (windows, Linux...) cannot boot. In particular, you may create a backup copy of normally installed and configured Windows and later restore Windows from such backup copy. So, in the case of fault OS itself and all software and its settings can be restored in 5-10 minutes.
-
Perform emergency boot of Windows NT / 2000 / XP. When the loader of this OS on the hard disk is damaged or misconfigured, you are able to load OS using another, standalone loader from this CD.
-
Recover master boot record of HDD. This allows to boot OS after incorrect uninstallation of custom loader (LILO, for example), which made all OS on your PC not bootable.
-
Delete, move, copy to file (image) and re-create partition from file. Image transfer over network is also supported: so you may configure one PC and then make contents of hard disks of other PCs same as contents of the hard disk of the first one.
-
Change password of any user, including administrator of Windows NT/2000/XP OS. You do not need to know the old password.
-
Recover deleted file, even file re-deleted from Windows Recycle Bin, and, in contrast, wipe single file or a whole disk so that it will be impossible to recover it in any way.
-
Recover data from accidentally formatted disk. Sometimes it helps to recover data from the disk, damaged by a virus.
-
Recover data from a floppy disk, which is not readable by OS. Format 3.5" disk for 1.7 Mb size.
Also the disk includes full set of external DOS commands, console versions of the most popular archivers/compressors.
Moreover, emergency boot CD includes minimal Linux distribution (Rescue Linux distribution) which may be very useful to a professional user.
how to find fight keyloggers
If your computer is accessed by other people (or even if not) you may want to find if somebody tries to steal your private data. One of the most used ways to do this is by installing a keylogger, a software (or even worse hardware) that captures the user's keystrokes (and that means they can see your passwords, credit card data, private conversations, output e-mails...). Here are a few ways you can use to check if a keylogger is installed on your computer:
1. Use up to date anti virus and/or anti spyware software
Typically a good anti virus software will find most of the commercial keyloggers and maybe more. Keep the software up to date and don't forget to enable advanced detection features for best results (for example check "Potentially unwanted applications" in NOD32).
2. Use a special software tool
There are a bunch of anti-keylogger software on the market and you may get better results with those. I recommend you to use them if you think there is a high possibility to have a keylogger installed. For example I found Cyberhawk to be the only software that detected a custom made keylogger. Kasperky does a good job in this area too. Also check anti-spy.info. More examples:
- http:
/ / www. microsoft. com/ athome/ security/ spyware/ software/ default. mspx - http:
/ / www. lavasoftusa. com/ software/ adaware/ - http:
/ / security. kolla. de/ - http://www.clamwin.com
If you are more like an advanced user you can try finding keyloggers by using a few tools like regedit (registry editor) and/or Process Explorer. It will save you some money but it gets harder and harder to find advanced spyware. You can look here or here for more information about using Process Explorer.
You can also try some hot key combination that are used by this kind of software. Examples: Ctrl + Alt + X or Ctrl + Alt + Wondows Key + X
4. Free tools you can use:
- PSMAntiKeyLogger
PSMAntiKeyLogger is a real-time protecting software which protects you against Keyloggers. No scanning is needed. - SnoopFree
Freeware antikeylogger that block hook based keyloggers as well as screen captures. For Windows XP. - I Hate Keyloggers
Freeware antikeylogger that block hook based keyloggers. For Windows 2000 and XP. - KL-Detector
Freeware on demand keylogger scanner.
12Business Skills You Need To Master
Developing a small business into a successful enterprise demands more than passion. Unfortunately, facts speak for themselves. Over half of new businesses fail mainly because the entrepreneur is unable to translate their passion into practical business skills. Success demands more than hard work, resilience, and expertise in your field. In order to succeed, you need to understand and to become proficient in a set of fundamental business skills.
Running a small business requires that you become a jack-of-all-trades. It is important to know early on which skills that you have and those that you will have to learn or delegate to others. When it comes to the skills that you lack, you can learn these skills over a period of time by yourself, you can hire employees who are strong in specific areas, or you can engage the help of a professional business advisor.
Here are the essential soft skills (people skills or anything that is not a technical skill) that you will need to learn or import to help you to succeed in your business:
• Delegation Skills -- Delegation involves assigning responsibility to other people for the completion of work. The ideal position that you want to obtain is one where your staff carries out all the routine activities of your business. Effective delegation involves achieving the correct balance between effective controls and allowing people to complete their job effectively. The key element is knowing how to make your business work, rather than your business working you!
• Communication Skills -- Communication is an important part of life and is one that is often taken for granted. When you think about it, almost everything you do requires improved communications. To be effective in business, you have to communicate well. When you hire a new employee, good communication skills help you select the right person. When you communicate with your various stakeholders, you need to be clear about your expectations and to be sensitive when dealing with problems. The key is to know how to effectively communicate your vision with passion and conviction.
• Negotiation Skills -- Almost everyone negotiates informally on a daily basis without even being aware of it. Formal negotiation is a skill that can be learned through experience and practice. People who negotiate frequently tend to be more skilled at it than people who have not participated in many formal/informal negotiations. Experienced people are more likely to know what to say, when or when not to say it, or when or when not to make concessions. The key is to know how to develop a win-win approach in negotiations with all parties, but at the same time keeping in mind that you also want to obtain the most favorable outcome possible for yourself.
• Strategic Planning -- Strategic planning is a very important business activity. Strategic planning is a process of defining your company's strategy or direction and making decisions on allocations of resources of capital and people. The key is to know how to project your company's future performance, within a three-to-five year framework or more, supported by your well-defined business plan.
• Leadership Skills -- Leadership is a process of getting things done via people. Leadership, a critical management skill, is the ability to motivate a group of people toward a common goal. Leadership is also the ability to take charge, assemble, mobilize, and motivate teams. The key is to know how to forge long-term relationships with prospects, customers, suppliers, employees, and investors.
• Team Building Skills -- Team-building and teamwork skills are essential for an entrepreneur in today's workplace. People working at their potential in teams generate better solutions and more productivity than individual members working independently. The key is to know how to build teams of employees, partners, advisors, and investors that will help you take your business to the next level.
• Analytical Skills -- Today’s workplace is becoming more technologically advanced and complex. With this rapid increase of technology, the need for analytical thinking also increases. Analytical thinking is the ability to objectively assess the present state of your business, to determine where you want to be in the future, and what to do in order to close the gap between the present and the future growth of your business. The key is to know how to gather, review, and evaluate data that is necessary to formulate and express compelling arguments.
• Sales and Marketing Skills -- Establishing successful sales and marketing methods and policies - from pricing and advertising to sales techniques - are essential in growing your business. The ability to analyze your competition, the marketplace, and industry trends are critical to the development of your marketing strategy. The key is to know how to craft and communicate a compelling message to the right target audience that generates new business, and in turn, builds profitable revenue streams.
• General Management Skills -- Management involves directing and controlling a group of one or more people for the purpose of coordinating activities that will accomplish a goal. Management encompasses the deployment and direction of human resources, financial resources, and technological resources. The key is to know how to develop and implement a workable management system that will manage daily operations, nurture stakeholders, and support business growth.
• Cash flow Management Skills -- Cash flow is generally acknowledged as the single most pressing concern of the small and medium-sized businesses. In its simplest form, cash flow is the movement of money in and out of your business. Cash flow is the life-blood of all growing businesses and is the primary indicator of business health. The effect of cash flow is real, immediate and, if mismanaged, totally unforgiving. The key is to know how to monitor, protect, control, and put cash to work.
• Financial Management Skills --The activity of finance is the application of a set of techniques that individuals and businesses use to manage their money, particularly the differences between income and expenditure and the risks of their investments. The need for timely budgeting and reporting of financial performance is of the upmost importance. The key is to know how to interpret and analyze your financial statements, in such a way, as to identify the items that are adversely affecting your profitability.
• Time Management Skills -- Time Management is a set of related common-sense skills that help you use your time in the most effective and productive way. Time Management is a very important skill to master. Learning this skill will empower you to achieve more and to use your time wisely. The key is to know how to manage your time efficiently and to focus on the activities most likely to deliver value to your business.
Copyright © 2007 Terry H. Hill You may reprint this article free of charge in your newsletter, magazine, or on your website, provided that the article is unedited, and that the copyright, author's bio, and contact information below appears with each article. Articles appearing on the web must provide a hyperlink to the author's web site.