If that situation happened today though, it could have been easily avoided. Bandwidth is now much more plentiful then it was a few years ago, and Windows XP has remote access capabilities built into the operating system. In this article, I’ll demonstrate how your support staff can reduce costs by taking advantage of Windows XP’s remote desktop feature. As I do, I’ll show you the ins and outs of how remote desktop works.
The Basics
Remote desktop works very similarly to the Windows 2000 Terminal Services. In fact, the local PC actually uses a cosmetically altered version of the Terminal Server Client to access the remote PC. During a remote desktop session, Windows XP uses something called the Display Protocol. This protocol sends keyboard and mouse movements from the local machine to the remote machine, where the remote desktop code acts as if the keyboard and mouse movements were generated locally. The remote machine then sends screen updates to the local machine to display the results of any actions that are being performed remotely. It’s also possible for the remote machine to send sound to the local machine, but I don’t recommend doing so because of the required amount of bandwidth.
Another thing that you should know is that during a remote session, any programs that the local machine initiates are actually being run on the remote machine. This means that it’s possible for the local machine to run programs that aren’t installed on it. It also means that it’s possible for the local machine to run programs that aren’t compatible with it. For example, suppose for a moment that you connected to a remote machine through a Pocket PC. It would be possible for you to run any application that’s installed on the remote machine because you’re actually using the remote machines resources rather than those of the Pocket PC (which isn’t even capable of running most Windows programs).
The last thing that I need to mention before I show you how to implement remote desktop is that not all versions of Windows XP support it. Only Windows XP Professional can host a remote desktop session. The home version ships with the ability to control a remote PC, but can’t host a remote session. This means that you can use the home edition or the professional edition to control a machine that’s running Windows XP professional, but neither version can control a machine that’s running the home edition.
Preparing the Remote Machines
Before you can remotely control a machine, the machine has to be prepared for remote access. If you’re going to be performing a mass Windows XP deployment, you’ll be able to set the remote desktop settings at the same time that you configure all of the other Windows settings. If you’ve already deployed Windows XP though, you’ll have to implement the Remote Desktop settings on an individual basis. There are a few good ways to accomplish this.
One method is to just go around to every machine and turn the feature on. Another method is to enable the feature the first time that each user calls you with a problem. By using this method, you’ll usually end up installing remote desktop on the machines belonging to the users who have the most problems first, and then gradually to the users who call less often.
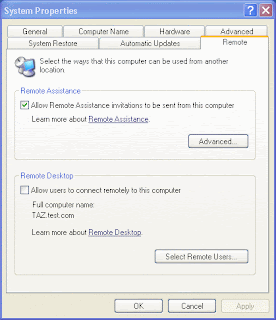
To implement remote desktop on a workstation, go to the Start Menu and right click on My computer। Now, select the Properties command from the resulting context menu in order to display the system’s properties sheet. At this point, select the properties sheet’s Remote tab. As you can see in Figure A, the Remote tab contains two check boxes. One check box is to allow users to remotely connect to the computer, while the other allows remote assistance invitations to be sent from the computer.

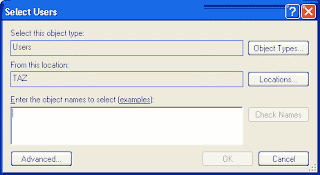
Windows will now display the Remote Desktop Users dialog box. Click the Add button to begin adding users to the list. If you’re in the habit of selecting which users can access a network resource, then this screen may look a little funny to you. As you can see in Figure B, Windows is set by default to work with user objects from the local computer. The reason is that the people who developed this portion of Windows XP assumed that most of the time when you access a remote PC in this manner, you won’t be authenticated into a domain. You can select domain users though by clicking the Locations button and selecting a domain from the list. Regardless of whether you’re working with domain users or local users, you won’t be able to select the users from the list. Instead, you’ll have to manually enter the user name and then use the Check Names button to verify that you spelled the user names correctly.
Figure B

As I mentioned, the reason that this particular feature is so strange to setup is that Microsoft intended it to be used for other purposes. They designed it as a way to allow you to access your PC at the office from home or while you’re on the go. Although there’s another option that’s actually intended for tech support, I recommend going ahead and enabling the remote desktop in the manner that I just described. You should also assign a standard account access to all machines. The reason for doing this is that the remote desktop option that’s actually intended for tech support purposes requires a user to send an invitation to someone, asking for help. If the user can’t figure out how to send an invitation, then they won’t be able to get remote assistance. By going ahead and enabling the type of remote access that I just showed you, you’ll be able to help users by remote even if they don’t know how to send an invitation.
That doesn’t mean that the users shouldn’t be able to send an invitation though. I recommend leaving the option for remote assistance invitations enabled. You can however control the length of time that an invitation is valid by clicking the advanced button on the System Properties sheet’s Remote tab. By default, invitations are valid for 30 days.
Right now, you may be wondering what the deal is with a remote assistance invitation. Remote assistance invitations are a method through which end users may ask for help. Typically, users generate an E-mail message that includes an invitation. However, invitations may also be sent through Windows messenger or through a file. Before you implement the ability for users to send remote invitations, keep in mind that there are some very serious security risks associated with doing so. I’ll be addressing these security risks in a separate article series. For now though, it’s just important to understand what remote invitations are and what they do.
As you can see, setting up remote access capabilities provides the support staff with a low cost way of servicing your end users. This technique is especially effective in organizations that are geographically dispersed.
No comments:
Post a Comment